


This post is based on a tutorial I created to teach students at The Flatiron School the basics of integrating Ajax with Rails. This guide is appropriate for beginners who have already learned the basics of Rails and jQuery.
It will walk you through the process of adding Ajax to a very simple rails app for creating todo lists. First we’ll go through the basics of setting up the Rails app, then adding jQuery and Ajax to add items without reloading the page. Finally, we’ll refactor with remote: true. Feel free to code along!
Before getting to Ajax, here are the steps to create the basic rails todo app we’ll be building on:
1) rails new todo_app
2) rails g resource todo
3) In the migration file (located in db/migrate):
1 2 3 4 5 6 7 8 9 | |
4) In app/controllers/todos_controller.rb:
1 2 3 4 5 6 7 8 9 10 11 12 13 14 15 16 17 18 19 20 21 | |
5) In config/routes.rb:
1 2 3 4 | |
6) Create views/todos/index.html.erb with a basic form and list of todos:
1 2 3 4 5 6 7 8 9 10 11 12 13 14 15 16 17 18 19 20 21 22 23 24 25 26 | |
7) Before starting up the rails server: rake db:migrate
Now we can create new todos and destroy them. This is as functional as our app needs to be. Except for one thing. Since this is a single page app, it would be really nice if we could add and remove todos without reloading the page. Enter Ajax!
Now we are going to “ajaxify” the process of creating todos. Since we are entering JavaScript land, we’ll go into app/assets/javascripts. You’ll see a file called todos.coffee or todos.js.coffee. We will not be using CoffeeScript, so rename it to todos.js.
Here’s what we are going to implement:
When the “Create Todo” button is clicked, we will stop the default form submission behavior from happening, and send an Ajax request instead. To break this down further, here are the steps we’ll need to follow:
In app/assets/javascripts/todos.js:
1) Make sure the document is ready before doing anything else.
1 2 3 4 | |
2) Listen for the submission of the form.
1 2 3 4 5 6 | |
3) Prevent the default behavior (the form submitting and the page reloading).
1 2 3 4 5 6 7 8 | |
In order to make the Ajax request, we’ll need to give the request the correct action and method to take us to the create action in the todos controller. If we rake routes, we’ll see this:
POST /todos(.:format) todos#create
So we know we will be making a ‘post’ request to ‘/todos’. We could hard code this in our Ajax request, but what if our routes change later on? Our request would no longer work. In order to make our code more robust, we’ll get the correct action and method directly from the form itself. Basicaly, we’ll ask the form where it was going by extracting the information with jQuery.
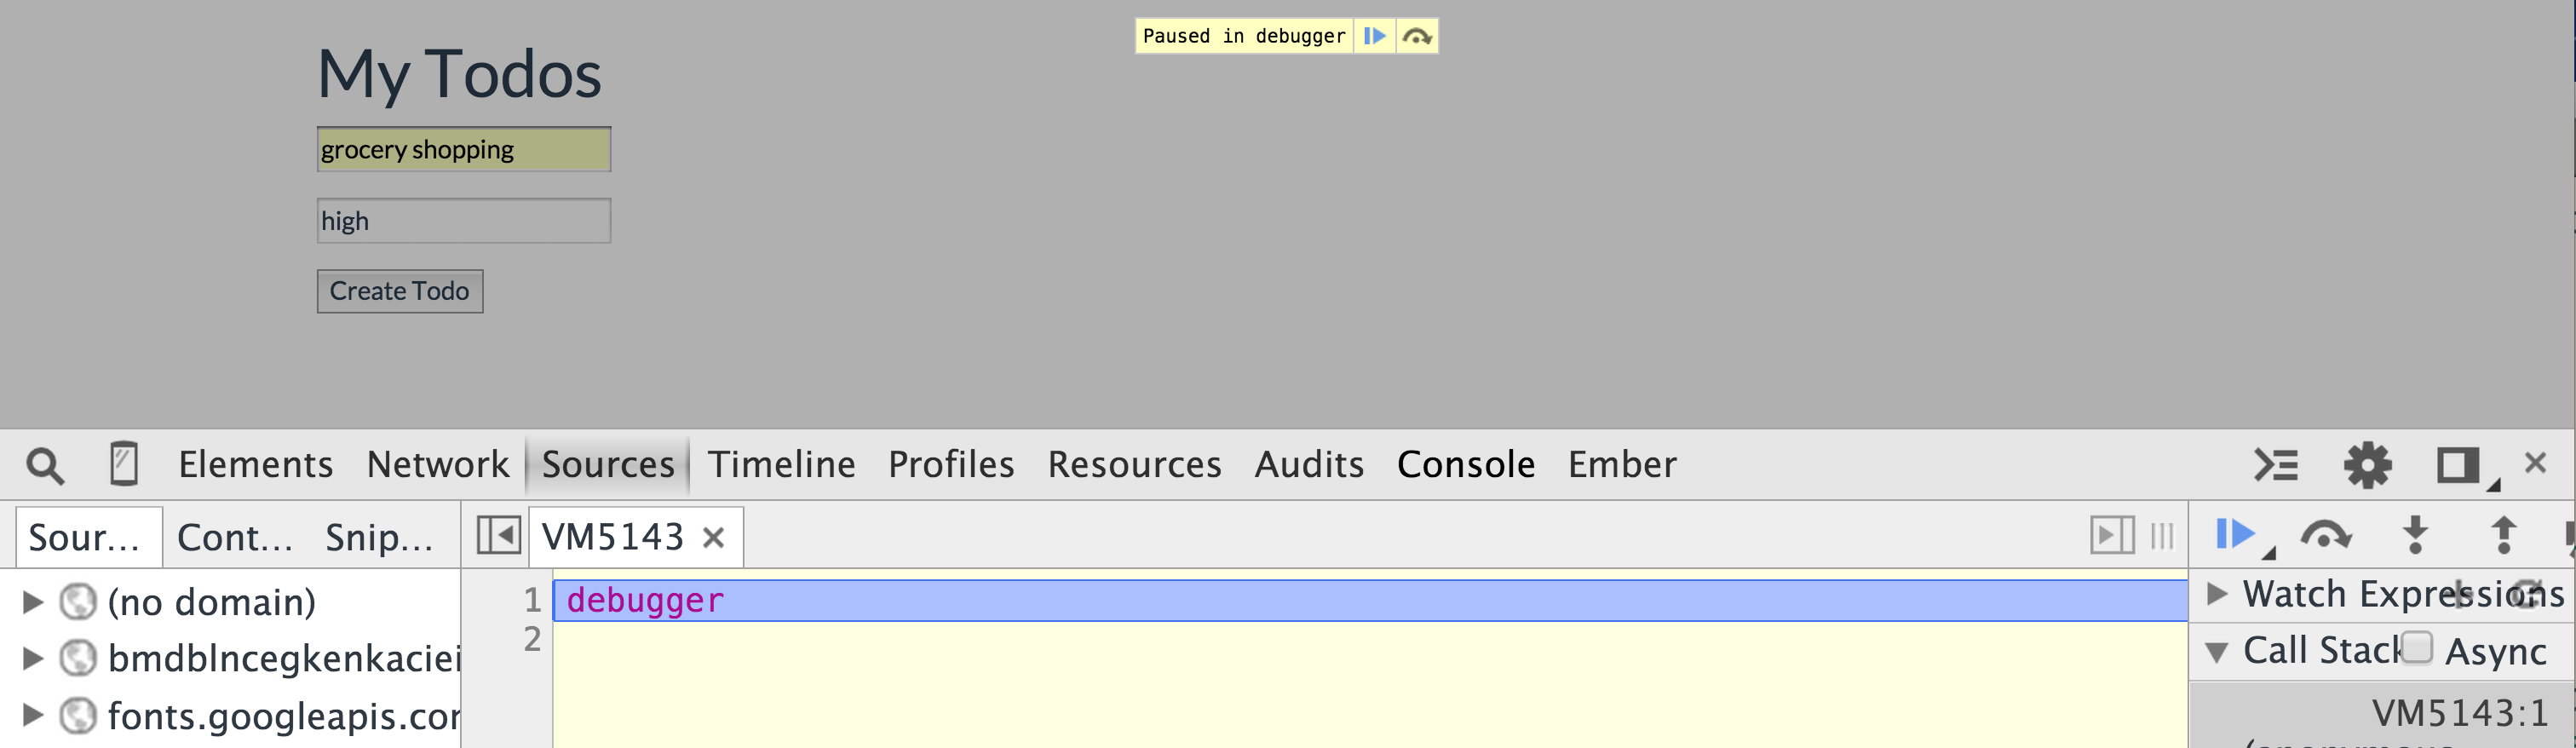
The debugger we threw into our code above will be really useful in figuring out the jQuery code for pulling out the information we need. With your server running and your JavaScript console open, fill in the form and hit the submit button. When the debugger gets hit, what is this?
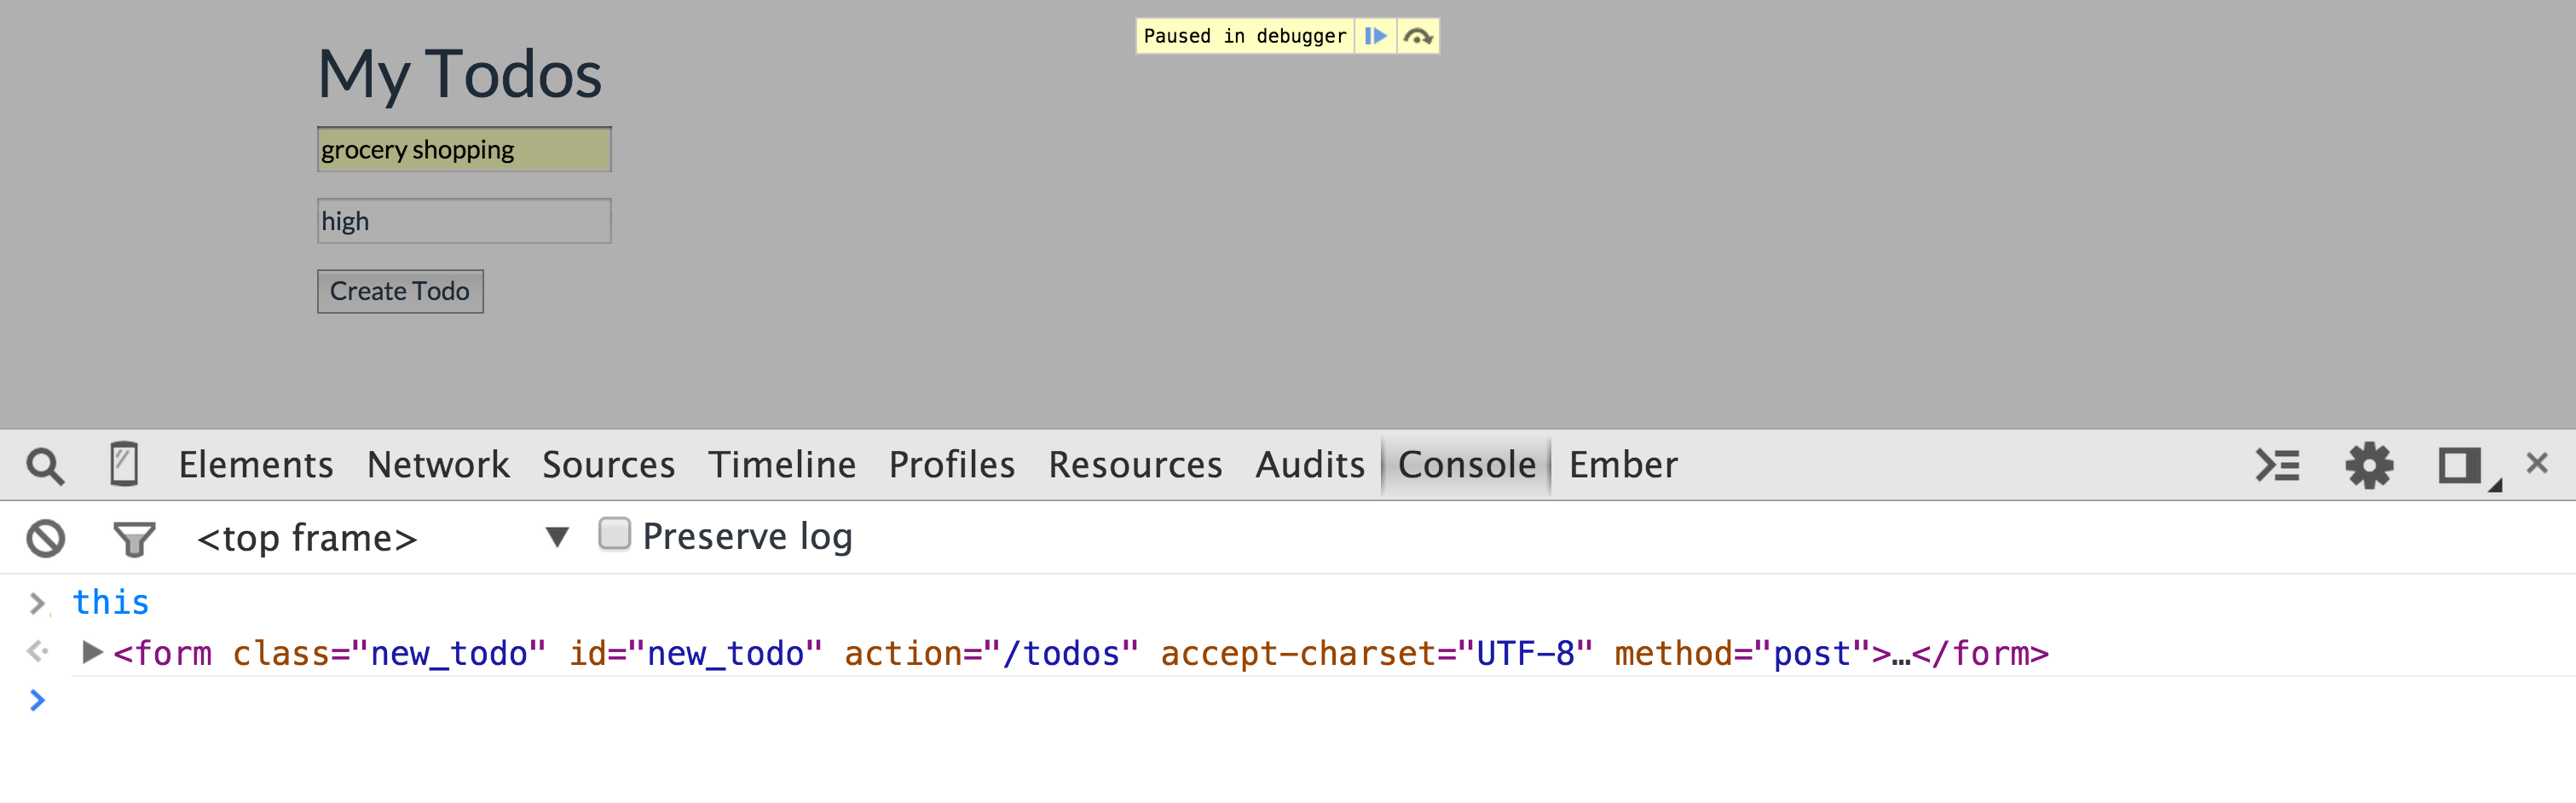
Since our debugger is inside the function that’s attached to the form submission, this is the form itself, and the action and method we need are right there! Let’s use jQuery to grab them, using the handy .attr() method.

1 2 3 4 5 6 7 8 9 | |
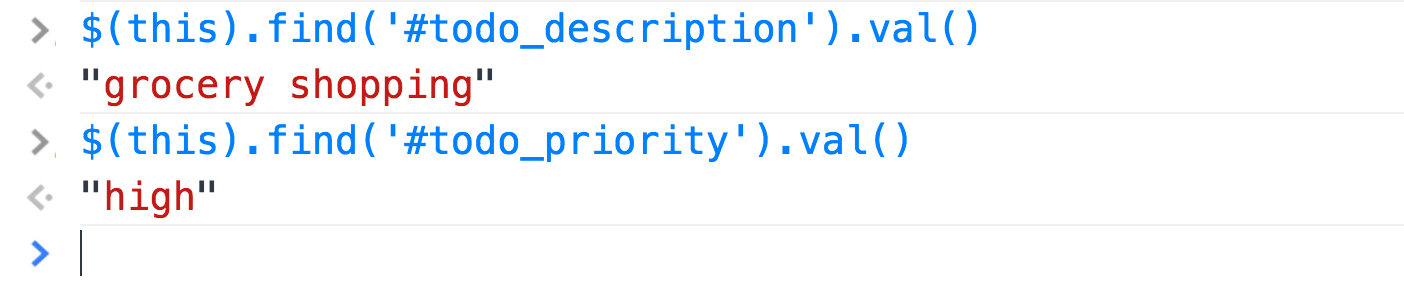
Of course, we also need the text we entered into the form for the todo description and priority level. If we open up the form element and all the divs that live inside of it in our console, we see that Rails gave our inputs some nice ids that we can use to select them with. Specifically, there’s an input with an id of “todo_description” and an input with an id of “todo_priority”. Lets grab these using the jQuery .find() method.

We don’t see the values that we typed into the form yet, but we can pull them out using the jQuery .val() method.
Great! Let’s store these values as variables so we can pass them in to our Ajax request.
1 2 3 4 5 6 7 8 9 10 11 12 | |
We are ready for the next step!
We are going to make an Ajax request that will deliver a JavaScript response to the create action in the todos controller.
The jQuery documentation for writing Ajax requests is really nice, so here’s some code I pulled from there:
1 2 3 4 5 | |
If we change the method, url, and data to the variables we created, we should be good to go! Our todos.js should now look like this:
1 2 3 4 5 6 7 8 9 10 11 12 13 14 15 16 17 18 | |
Since we’re expecting this Ajax request to hit the create action in the todos controller, let’s put a binding.pry in there (make sure you’ve added gem 'pry' to your Gemfile and run bundle install first):
1 2 3 4 5 6 | |
Here’s what you’ll see when that binding gets hit:
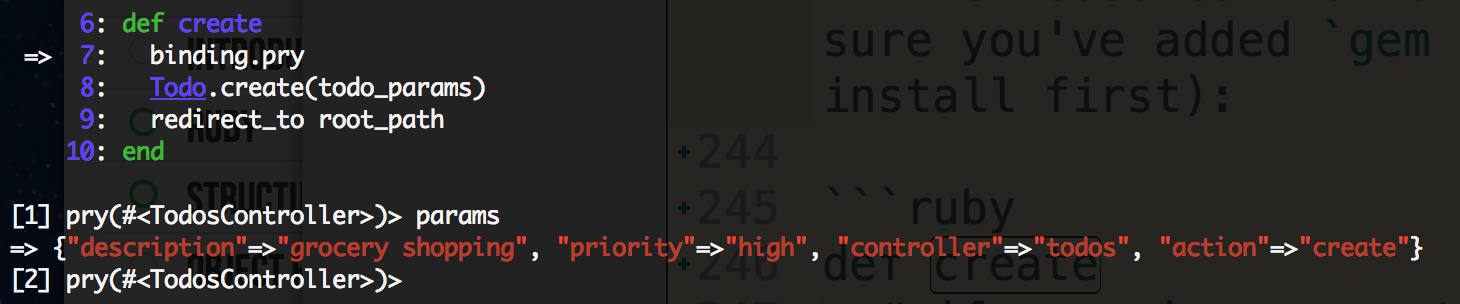
Success! The Ajax request went where we wanted it to go and it sent the params through the way we told it to. But params is not quite right. Since we’re using strong params, we need a nested structure where “todo” is a top level key. By changing our Ajax request to include data: { todo: {description: description, priority: priority} } this problem is solved, but there’s actually a jQuery method, .serializeArray(), that will take care of turning all our form data into a nicely structured object (nesting included!) that we can use in our Ajax call. Here’s how it looks in our code:
1 2 3 4 5 6 7 8 | |
Now our params will be structured the way Rails expects them to be, and we can move on to the next step!
We’re still in the todos controller create action, and we’re now able to instantiate new todos using the nicely structured params that we sent via Ajax. Currently, after creating the new Todo, we are just redirecting to the root_path. But the whole point of using Ajax is not to redirect. By default, a rails controller action handles responses that are sent in as html strings. We now want to tell it to respond to JavaScript:
1 2 3 4 5 6 7 8 9 10 11 | |
Before going further into what Rails will do with this JavaScript response, there’s one more problem with our Ajax request. We did not tell it to send back JavaScript! Let’s do that now, and our Ajax call should look like this:
1 2 3 4 5 6 7 8 | |
So now that we’re getting the response we want, what is format.js { } actually doing?
When Rails sees that line of code, it will automatically look for a file with the path app/views/<controller name>/<action name>.js.erb. In our example, it’s looking for app/views/todos/create.js.erb.
Make that file and throw a debugger in there to confirm that it’s actually where we land when we get out of the create action.
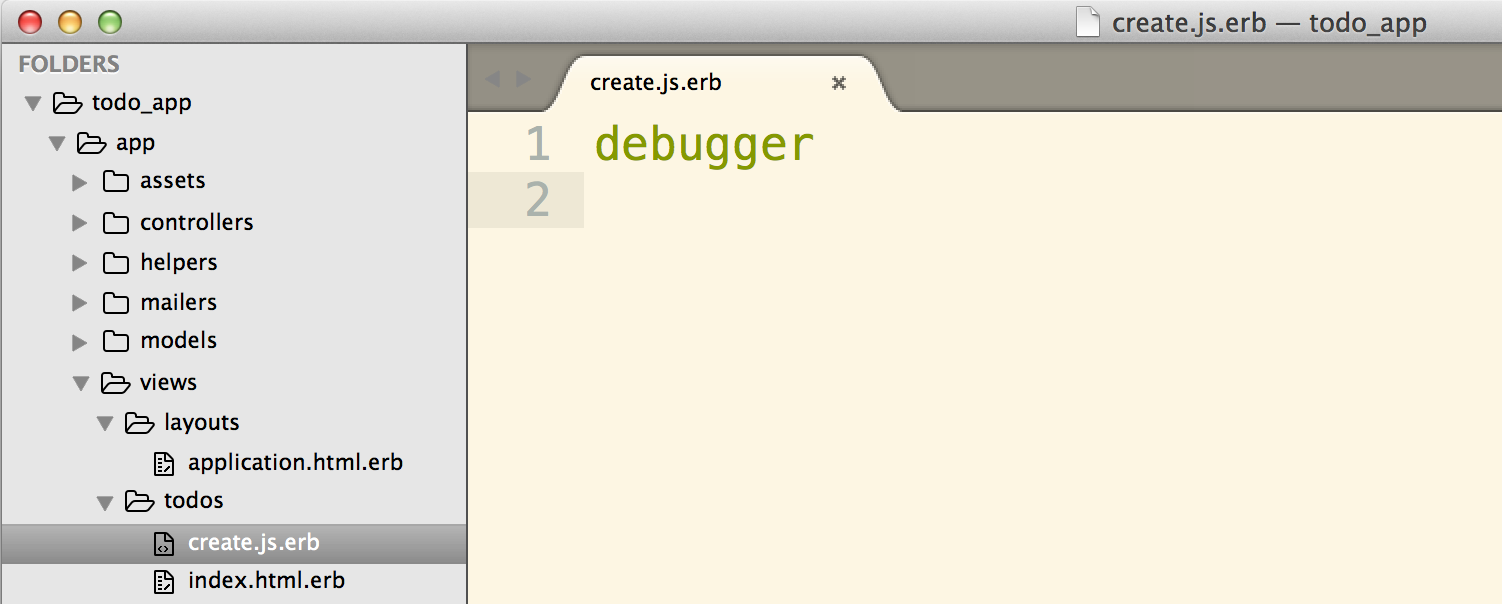
That worked! So now that we are in create.js.erb, we have access to any instance variables we created in the controller action that led us there, and we can write JavaScript and ERB (embedded Ruby) code to do whatever we want with our view. We should probably save our newly created todo in an instance variable for just that purpose.
1 2 3 4 5 6 7 8 | |
So what do we want to do next? In create.js.erb, we want to use JavaScript (or jQuery) to append the new todo to the <ul> where the todos live on the page.
We could do something like this:
1 2 3 | |
Now, when we enter a new todo description and priority and hit the submit button, it appears on the page and no reloading happens! That’s great, but it could use some refactoring.
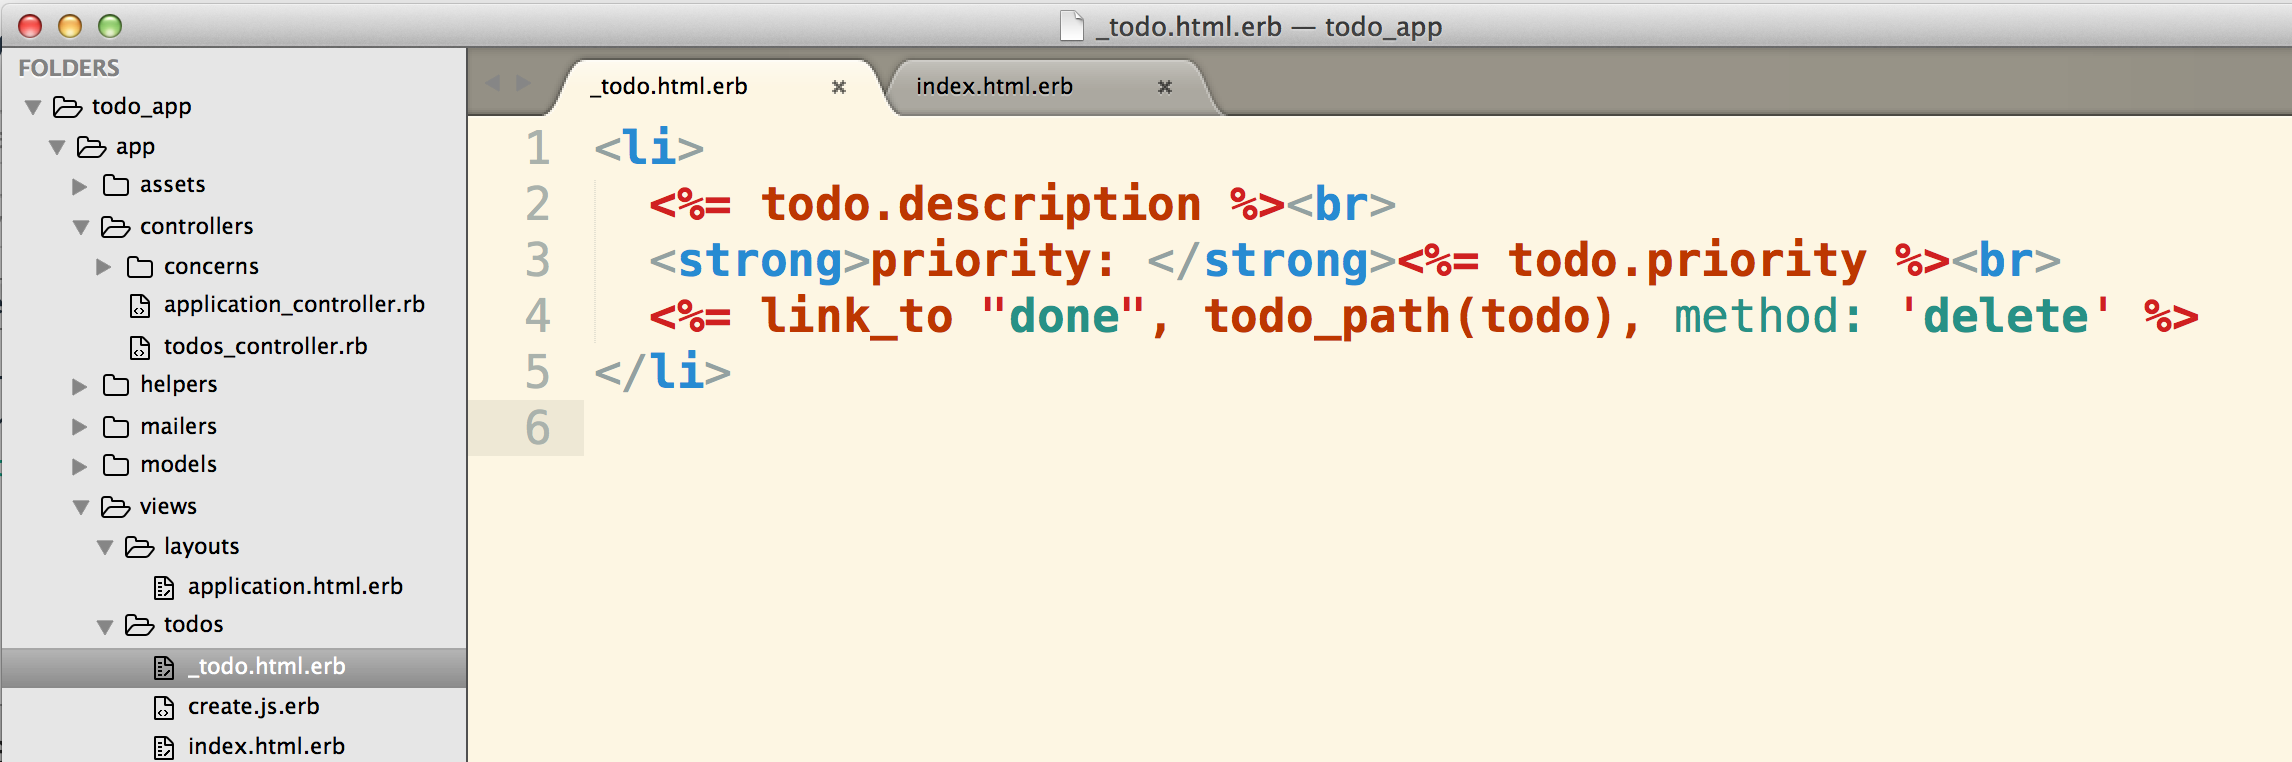
escape_javascript doing in there? We need that or the link_to will be evaluated as JavaScript and the whole thing breaks.The solution to this? A partial. Extract the code for displaying a single todo out of index.html.erb and place it in a new file at app/views/todos/_todo.html.erb:
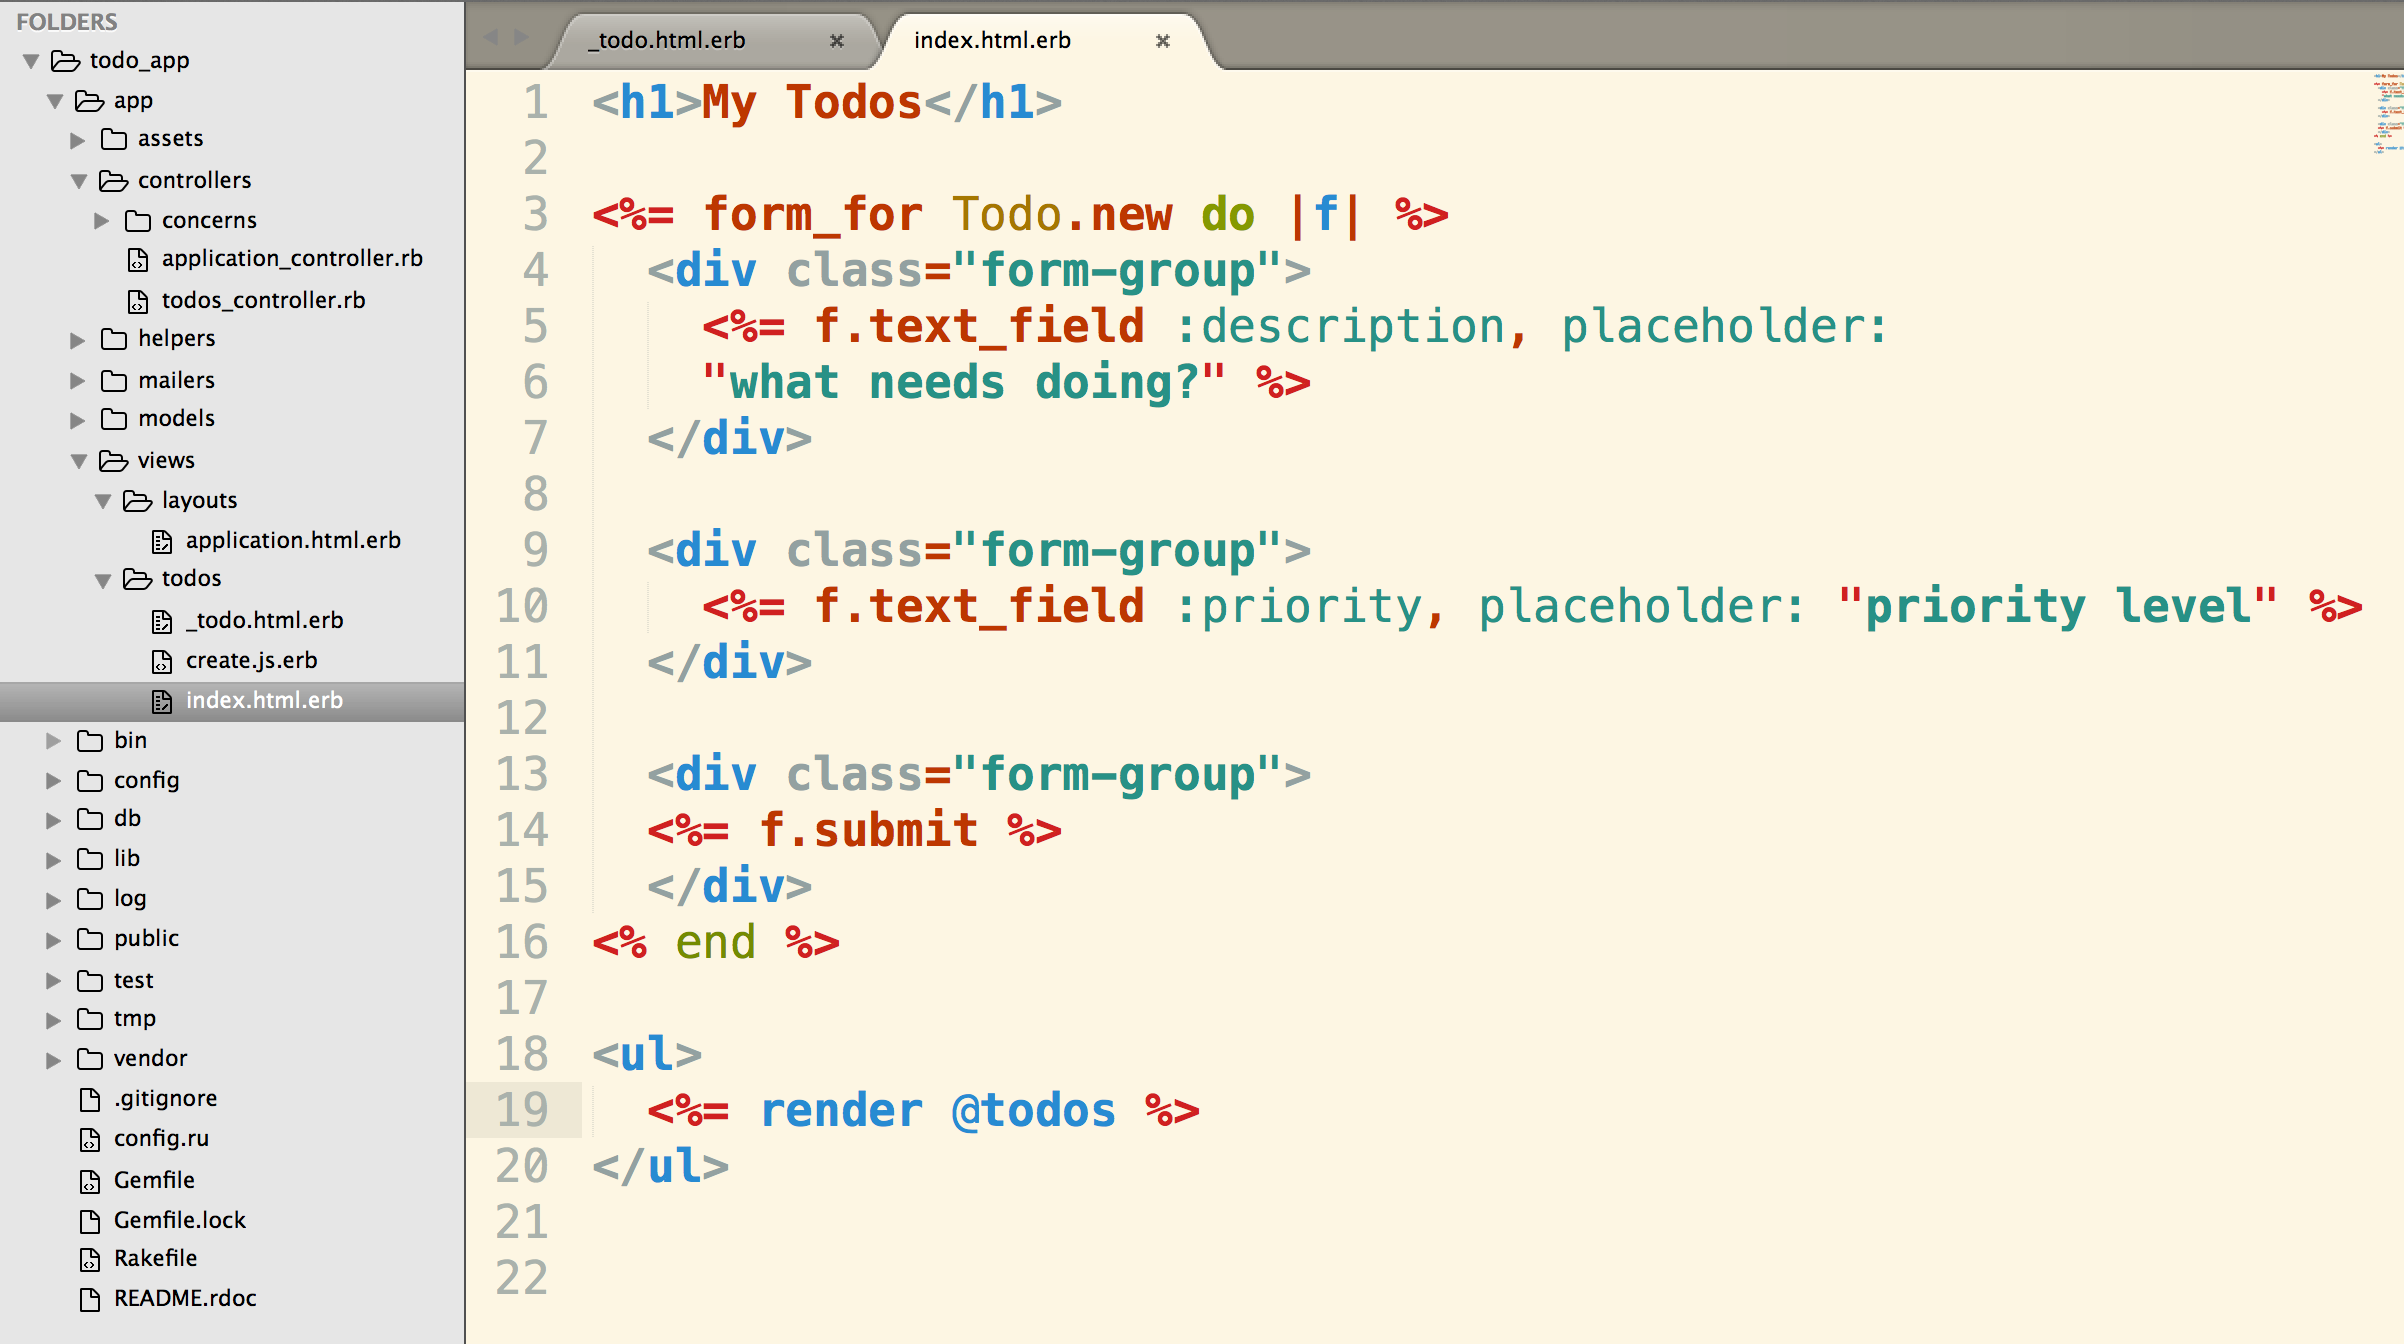
Now you can use Rails magic to render the @todos collection in index.html.erb:
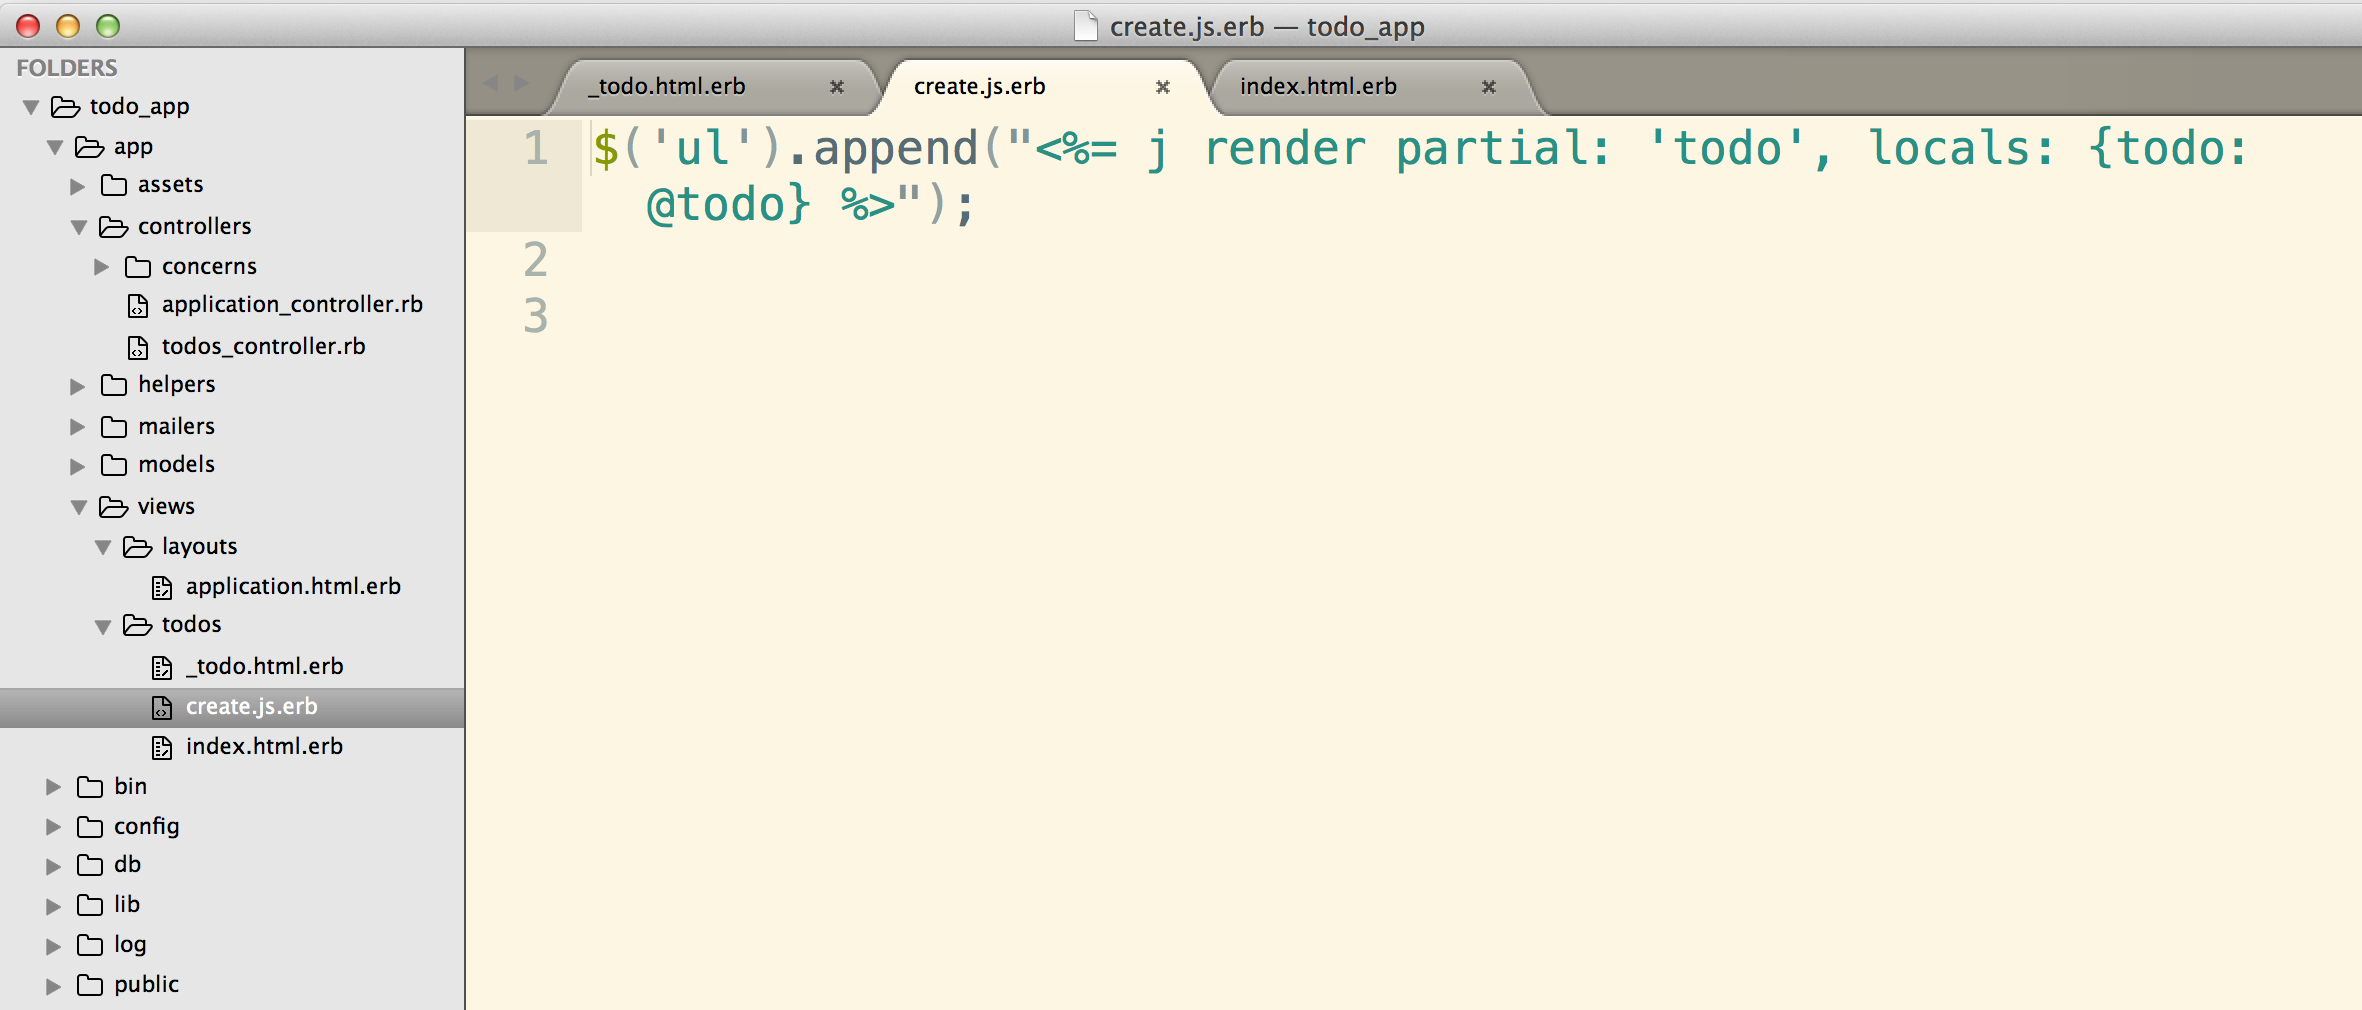
Finally, replace the html string we had in create.js.erb with code for rendering the partial, passing in @todo as a local variable:
And we’re done creating todos with Ajax! In the next section, we’ll refactor our code by using remote: true.
remote: trueIn Rails, both form_for and link_to helpers can take an argument of remote: true:
link_to with remote: true1
| |
In the case of our todo list app, we will add remote: true to our form for creating a new todo (the only change here is on the first line of the form):
1 2 3 4 5 6 7 8 9 10 11 12 13 14 | |
So, what does remote: true do for you? In short, it adds a data-remote="true" attribute to the generated html form as seen here, and submits the form via Ajax automagically. As with everything in Rails, there’s metaprogramming going on under the hood. In this case, the JavaScript code that we wrote to hijack the submit event and make the appropriate Ajax request is all generated for you behind the scenes. If you’re feeling extra curious, check out the Rails.js source code.
Here’s a small snippet from the source code linked to above. Not so surprisingly, it looks a lot like the code we wrote (especially lines 2-4!):
1 2 3 4 5 6 7 8 9 10 11 | |
Because Rails is providing all of this JavaScript for us, now that we’ve added remote: true to the form, we can get rid of everything in our todos.js file.
remote: true:1 2 3 4 5 6 7 8 9 10 11 12 13 14 15 16 17 18 19 | |
remote: true:1
| |
Just like when we manually wrote out the Ajax call, when the form is submitted the default behavior will be prevented and a JavaScript response will be sent to the create action in the todos controller. The controller will then send us to app/views/todos/create.js.erb, just as it did before. We will leave the rest of our code as is, and we are done with our refactoring!
remote: trueNow that we’ve seen the beautiful simplicity of remote: true, let’s see how quick and easy it is to remove todos from the database and the DOM with no refreshing needed:
1) In views/todos/index.html.erb, we have a link that hits the destroy action in the TodosController. Simply add remote: true to it.
Note: At this point it’s also important to give each <li> an id that will help us remove the correct item from the DOM after deleting it.
1 2 3 4 5 6 7 8 9 10 11 12 13 14 15 16 | |
2) Tell the todos#destroy action how to respond_to a JavaScript response:
1 2 3 4 5 6 7 8 9 10 | |
3) Remember that line 7 in the destroy action above will trigger Rails to look for app/views/todos/destroy.js.erb, so create that file and add code to select the todo to remove using jQuery. Let’s make it slideUp():
1
| |
And that’s it. With this simple yet powerful pattern, you can easily ajaxify all the things in all of your Rails apps. If you’re interested in learning more, I’ve listed some handy resources below. Happy coding!

Based on a talk I gave at the NYCHTML5 Meetup on June 2nd, 2015.
Any web app that involves real-time interactions between users requires some form of live notifications. Implementing this, for a beginner developer such as myself, can be a daunting challenge. This post will walk through how I went about solving this problem when working on Lacquer Love&Lend, a social network for nail polish lovers that allows users to interact via friendships and lacquer loans. As with any social network, I wanted users to see live notifications whenever they received a new friendship or transaction request, or when the state of any of their friendships or transactions changed. The example that follows assumes some basic knowledge of Rails.
In a basic Ajax request, a user clicks on something, the Ajax request gets sent, and a part of the DOM gets updated without the entire page reloading.

The code usually looks something like this:
1 2 3 4 5 6 7 8 9 10 11 12 13 14 15 16 17 18 19 20 21 | |
For the basic example, I’m omitting the controller and view as the main focus of this post is how I implemented live notifications. A more detailed explanation of basic Ajax follows in my next post - a prequel to this one, if you will :).
With the code above, a single user’s action of submitting the form sets off the whole chain of events. But for live notifications, more than one user is involved and the action that changes one user’s data is hapenning on another user’s client! Making this happen twisted my brain into a pretzel at first, but after several attempts I got the functionality I wanted. A description of these follows below.
In order to get a single part of the page to update without the entire page refreshing, I used a setInterval() function to make an Ajax request every 3 seconds. This would make a GET request to a custom route: users/:id/live_notifications that hit an action named live_notifications in the UsersController.
1) Separate the “live notifications” div into a partial:

2) Create a route and a controller action:
1
| |
1 2 3 4 5 6 7 | |
3) Make the Ajax request to hit users#live_notifications every 3 seconds:
1 2 3 4 5 6 7 8 9 10 11 12 13 | |
4) Once this Ajax request hits the controller (which is set up to handle a JavaScript response in the respond_to block), Rails by default will look for app/views/users/live_notifications.js.erb and execute the following to refresh the partial:
1
| |
This is all it took to refresh that single div every 3 seconds. However, it was far from ideal:
Lots of refreshing for no reason (like when you’re looking at another user’s page and no notifications are displayed, or when nothing has changed)
Things that never would change are part of the div that is being refreshed (like header text, for example)
Last but not least, this kind of indescriminate refreshing breaks the functionality of forms…

Thanks to jQuery pseudo selectors, we can stop the Ajax call from being made if an input field is currently focused:
1 2 3 4 5 6 7 8 9 10 11 12 | |
The next logical step up from the “refresh everything all the time” strategy was to refresh the live notifications div only when looking at one’s own show page (in other words, when the user id in the url matches the id of the current user stored in the session).
In order to make the current_user from the Rails backend available to JavaScript, I put the following in my application layout:
1 2 3 4 5 | |
With current_user.id stored in an object attached to the window, making sure the Ajax call only gets made when a user is looking at his/her own profile page is simple:
1 2 3 4 5 6 7 8 9 10 | |
To change only things that have changed, when they have changed, the ability to compare what’s on the back end with what’s on the front end is needed.
For this part, I needed to capture the state of all of a user’s transactions and friendships (the two things for which there may be a notification), and hide this information on the page. I created a method in the User model that returns all of these states in an array, and put this into a hidden element on the page:
![]()
Since the transactions could also have due dates, I did something similar for those.
The next step was to change the code in app/views/users/live_notifications.js.erb to check the current state of the user’s transactions and friendships and see if the #all-categories-tracker is up to date:
1 2 3 4 5 6 7 8 9 10 11 12 13 14 15 16 17 18 19 20 21 22 23 24 25 26 27 28 29 30 31 32 33 34 35 36 37 | |
With this final refactoring, checks are in place that stop the unnecessary refreshing that came with the first version:

The method I described above for achieving live notifications is very basic Ajax polling. Every serveral seconds, a request/response cycle fires. This inevitably means lots of database querying, even if the amount of refreshing can be reduced to a minimum. In my search for ways to reduce the burden this puts on the database, here are some other techniques I’ve found that may offer some advantages:
1) Long Polling
With this technique, a request fires and waits for a change before sending a response. Then another request can be fired.
2) Web Sockets
Very different than Ajax polling or long polling, web sockets are used for continuous communication between server and client.
3) Server-Sent Events
Unlike web sockets which allows for continuous back and forth from server to client, this technique establishes a persistent connection that allows the server to send data to the client, but not the other way around.
After spending three months in a happy Flatiron School chrysalis transforming into a web developer, I graduated a little over two months ago feeling optimistic yet uncertain about the future. I was confident that Flatiron had equipped me to hit the ground ready to build, and had fostered in me a love and excitement for code that would keep me pushing forward no matter where I went next.
Then there was the uncertainty. After spending nine years, more than a quarter of my life, in the education field, I was about to embark on something totally unknown. Coming from a completely non-technical background, as most of my classmates also had, I wondered if I was a “real” developer and how I’d fit in at a tech company.
Aside from the fact that I hadn’t studied computer science and spent most of my life considering nearly every career path except one as a programmer, the knowledge that I’d likely be the only (or one of the only) females in a team of developers at almost any company I ended up at made me wonder how I’d feel at home in this new community.
I had almost forgotten about the startling gender imbalance in tech while I was at The Flatiron School. One thing that sets Flatiron apart from its competitors is that its gender ratio mirrors that of the natural world. In fact, my class was over 50% female, as is the current cohort of students. It’s a place that felt instantly like home, where we all were just a bunch of humans who happened to be on a mission to learn how to code together. People have asked questions like “how does Flatiron get all these women?”. Although it may seem like an obvious thing to ask, maybe the question itself is indicative of part of the problem. Why not ask how the world of tech continues to be so skewed toward men?
These are tough questions to answer, but it’s clear that The Flatiron School is doing a lot of things right. And, I’m happy to say, some forward thinking companies in the world of tech are also stepping up to the challenge of facing and addressing the gender gap. Enter The Fog Creek Fellowship.
Thanks to a partnership with Fog Creek, Trello, and Stack Exchange, nearly every one of my female classmates was able to get a jumpstart on their new coding careers with the mentorship of a senior developer who was willing to devote real time and interest in helping us through the transition. My mentor Max Horstmann exemplified this. When I got that exciting but nerve wracking first technical interview, he was there to do an in-depth whiteboarding session and provide truly constructive feedback. When I had questions about the difference between SQL and NoSQL, he was happy to explain it and discuss the pros and cons. In fact he and all the other mentors in the program were always happy to geek out about pretty much anything with me.
Perhaps most importantly, just like The Flatiron School teaches us to “make no little plans,” my mentor gave me the courage to dream big for my career, not just look for my next job. Should I feel entitled to love what I do for a living? Yes. Could my passion project become a startup one day? Totally possible. This was not just going to be a career change for me – this was a revolutionary mind shift.
Certainly, The Flatiron School and The Fog Creek Fellowship don’t hold any magic answers to the daunting gender gap in tech. But the fact is, when we’re faced with challenges that seem almost impossible to overcome, often the best thing to do is just to throw your hat over the wall and do something. At the end of one journey and the beginning of a much longer one, I’m filled with gratitude and hope.
Today marked the end of my second week as an instructor at The Flatiron School, where I graduated just about two months ago. While working with a student this morning, I realized I had been taking for granted a piece of knowledge that I learned in week two of my own semester.
When I first was learning about object orientation, one of the most confounding things for me was when to use @, self., or no prefix at all when dealing with instance variables in class definitions.
After several conversations with classmates and instructors, I thought I had it all straightened out. My table mates and I even wrote an ‘Instance Variable Manifesto’ to make sure we’d retain this enlightenment for all time. Today, I was grappling with the issue once again. It’s funny how learning to program doesn’t always happen in a straight line. The experience reminded me not to take for granted things I “know”, and to savor the moments of re-learning.
Here’s the issue that led to my temporary existential crisis today (had I totally lost my grasp of object oriented programming, all knowledge of Ruby, and/or my mind entirely?):
Shoe.condition, with an attr_accessor.cobble, that sets a Shoe’s condition to "new".Shoe and then set its condition to "old". Then, it had the expectation that the condition of the shoe will be equal to "new" after calling the cobble method.This is the code my student had:
1 2 3 4 5 6 7 | |
At first glance, the reason this code was not making the test pass eluded me. We put a binding.pry in the cobble method, and found that while condition was indeed set to 'new', the test was still failing. Wasn’t condition = "new" just making a call to the condition= method provided by the attr_accessor? Apparently not.
In fact, as I later re-realized, condition = "new" was creating a local variable, condition with the value "new", which has nothing to do with the value of @condition. I was able to come back to understanding this concept when I recalled that I had grappled with this very same thing almost exactly four months ago, when I was working on the exact same lab. I searched through the notes I had taken during those early Flatiron days and found the “manifesto.”
Four months later, here’s my distilled version of it.
Use @ only in the initialize method or within a custom reader/writer method (this accesses the instance variable directly)
If you intend to ever read or write to an instance variable, build the appropriate reader/writer methods or use attr_accessor, attr_writer, or attr_reader as you deem appropriate. This allows you to delegate getting and setting your instance variables to methods rather than having to manipulate the variable directly.
When altering the value of an instance variable, use the writer method prefixed with self. Without giving the writer method an explicit receiver (self), the Ruby interpreter will assume you are setting a local variable rather than calling the writer method (this is what led to the bug in the code snippet above).
When simply reading the value of an instance variable, the reader method may be called with no prefix. The receiver of the reader method is implicitly self.
Here’s a code example to demonstrate usage of the previous guidelines:
1 2 3 4 5 6 7 8 9 10 11 12 13 14 15 16 17 18 19 20 21 22 23 24 25 26 27 28 29 | |
Note that you can also use self. when calling reader methods, and it sometimes feels semantically more natural to do so. Unlike using @, this still delegates responsibility to the reader method, exactly the same as calling the reader method with no self. prefix.
TL;DR
Use @ in the initialize or reader/writer methods.
It’s better to delegate to reader and writer methods rather than accessing instance variables directly.
You cannot call a writer method without the explicit receiver, self. When Ruby sees the = (or -=, or +=), it assumes you are setting a local variable if no receiver is specified.
This post will not be about how I’ve spent the last ten weeks at The Flatiron School making awesome friends while coding together, or about my process of becoming friends with code. Those are posts for another time. This one is about the kinds of friendships that are actually built with code, the kind you can persist in a database.
Over the course of working on my two most recent projects, I’ve discovered that there is more than one way to make a friendship happen on the backend of a Rails app (or most likely any app). My first crack at making friendships was for a nail polish sharing app where friends can view each other’s collections and ask to borrow from each other. I watched Treehouse’s tutorial on building social features in Ruby on Rails, which is a good place to start if you’ve never done something like this before. Although it helped me understand it somewhat, the way it was done in the tutorial still seemed pretty complicated to me. I decided to try to figure it out on my own so that I could break it down and understand it better.
Here are the basic back-end requirements for creating a friendship (clearly some buttons and forms on the front-end are needed, but those are implementation details, so I’ll leave them out of this post):
You have to teach your models that some Users have relationships with other Users (a self-referential association).
You have to store that relationship in the database so that both sides of the relationship have knowledge of it and access to it.
You have to have a way of representing and keeping track of the state of the relationship at any given time (requested, accepted, etc.)
Here’s how I did it in my first go-around:
1) I created a join table, friendships:
1 2 3 4 5 6 7 8 9 10 11 | |
2) In the model for Friendship, I taught it that Friends are really just other Users:
1 2 3 4 5 6 7 8 9 10 11 12 | |
As you can see from the above, I decided I didn’t want to allow “duplicates” of friendships in the database, but as it turns out there are reasons why you might not want to do it this way. I’ll go into that later.
3) I made the User model aware of the Friendship model:
1 2 3 4 5 6 7 8 9 10 11 12 13 14 15 16 17 18 19 20 21 22 23 24 25 26 27 28 29 30 31 32 33 34 35 36 37 38 39 40 41 42 43 44 45 46 47 | |
You’ll notice that I wrote a whole bunch of methods to tell Users how to find their friends on both sides of the relationship. I wanted to give users custom notifications in the views depending on whether they had a pending request or a request awaiting their approval, which was part of the reason for this. But even if I hadn’t wanted to do that, I would have at least needed some kind of setup like this that makes multiple hits to the database every time someone wants to see all of their friends.
4) Finally, state is a big part of this model. I set it up so a friendship could have a state of pending or accepted (similar methods would create other states, like rejected). This is where the friendships controller comes in. For the sake of brevity, I’ll just describe the create and update methods:
1 2 3 4 5 6 7 8 9 10 11 12 13 14 15 16 17 18 19 20 21 22 23 | |
Since I’ve made a column in the friendships table for state, I can set and update the value of that attribute so a Friendship can introspect on the state it is currently in (what if we could write a method for doing this in real life?).
I set the state of the friendship to 'pending' whenever it first gets created. Then, when the User who was “friended” decides to hit the ‘Accept’ button (or the ‘Reject’ button as the case may be), the friendship can get updated accordingly.
So, although the implementation of friendships I ended up with in my first attempt has the functionality I wanted, but as I mentioned before, it’s not the most efficient. While my reasoning was that it is not desirable to have two rows in the friendships join table for every relationship that gets created, this reasoning did not take into account the way databases work. Because I have to query twice (Who are the people I’ve friended? Who are the people who have friended me?) every single time I want to access my friends, this is actually unneccesarily expensive. Since rows in a database are cheap, why worry about adding an extra row if it reduces the number of times you need to hit the database?
I got a second crack at this problem during my current project, an app for teachers that includes functionality for generating seating charts according to who works well together and who doesn’t. Along with my teammates, we built Buddyships (and Enemyships, too!) in a more reciprocal way:
1 2 3 4 5 6 7 8 9 10 11 12 13 14 15 16 17 18 19 20 21 22 23 24 25 26 27 28 29 30 31 32 33 34 35 36 37 | |
In this implementation, two rows in the join table are created for each relationship, using a method aptly called inversify.
Because of the reciprocal nature of the relationship created in this model, one database query (student.enemyships) is all it takes to find all potential Enemies. If you were only creating relationships, you’d care about not writing to the database more than you needed to. But since, in general, we query for friendships way more frequently than we create them, we want to make sure the querying is as efficient as possible.
So, while one-way relationships are fine for a follower-followee type of relationship, if you want to create a reciprocal relationship in your next app, don’t shy away from those extra rows in the database.
We’re nearing the end of the amazing whirlwind that is week eight at The Flatiron School. We’ve bid farewell (at least for now) to lectures and labs, and have blasted off into project mode. No predetermined specs, no Ironboard green lights, just forty eager, fledgeling developers putting all of their ambition, grit, and new skills into building things.
In the midst of the whirlwind, Obie Fernandez, author of the “bible” for Rails development, dropped by to chat with us today. It was inspiring to hear him talk about one of his latest endeavors, the Andela Fellowship, which is a program whose mission is to train some of the brightest young people in Africa to be awesome developers and connect them with employers. Echoing the words of The Flatiron School’s own Avi Flombaum, Obie told us that learning to be an awesome developer is not just about learning “hard skills”. It’s about learning to be an awesome person. Furthermore, he said,
“Programming is a career that encourages awesomeness.”
Though it wasn’t the first time I heard that message, it meant something more to me today than it did in week one, and the words sat quietly brewing in the back of my brain as I spent the evening coding with my teammates.
Does the act of learning to program make you a better person? I’m not so sure of that, but I’m sure that learning to be an awesome person makes you a better programmer. And while learning about nested hashes doesn’t somehow magically make you an awesome person, I do believe that people who are continually striving and struggling to be great programmers will be nudged in the direction of awesomeness by the nature of the endeavor itself.
So, what is it about programming that encourages awesomeness?
Communication and Empathy:
No successful programmer works in isolation. I’ve learned at The Flatiron School that while you might go faster alone you definitely go farther if you work together. Failure to listen and communicate effectively negatively affects the team, the workflow, and the product.
Code is for communication. It’s not just a set of instructions for a computer. When it’s done right, code tells a story that other developers can understand and build upon.
Caring About The Small Things:
Going With The Flow:
Grit:
Being a Lifelong Learner:
Before I end this post, let me be clear that by no means do I believe any of the above qualities are unique to the set of people known as “programmers”. In fact, anyone can learn to program. More importantly though, anyone can learn the skills it takes to be an awesome person. I’m just really happy to find that learning both of these in parellel go so nicely hand in hand.
After spending six weeks in Ruby land, last week was all JavaScript all the time at The Flatiron School. I feel like I’ve just added a hammer with superpowers to my programming tool box. You might bend a few nails along the way, but you can build almost anything with it.
Also, JavaScript is weird. Although it cares a lot about semi-colons, there are some important ways in which, just like the honey badger, it just doesn’t seem to care at all. Here I will attempt to get comfortable with this strange new animal by diving deep into some of its more surprising aspects. To provide some contrast and context, especially for those who (like myself) are more at home with Ruby, I’ll make some comparisons as I go along.
Let’s dive right in. For comparison, here is some Ruby:
1 2 3 4 5 6 7 | |
In Ruby, a method is a scope gate, so dog is not defined in the bark method. Ruby will tell you this in no uncertain terms:
1 2 3 4 | |
On line 4, Ruby has no idea about what dog is, because the universe in line 4 is the local scope of the method bark. This scope gate can be very nice, since it means we cannot accidentally overwrite a variable we defined in the global scope from within a method. In order to make dog into a global variable that we can access inside the method, Ruby requires us to be very explicit about it, putting a $ in front of that variable both where it is defined and wherever it is referenced:
1 2 3 4 5 6 7 | |
Now we clearly see that we are playing with a global variable, and Ruby plays along:
1 2 3 | |
While JavaScript does have a concept of functions creating a new scope, variables assigned outside of those functions can easily be accessed from within:
1 2 3 4 5 6 7 | |
JavaScript doesn’t care if you want to reach outside the function’s scope to grab a variable. JavaScript functions have knowledge of the universe around them:
1 2 3 | |
So what else can you do with a variable defined outside a function from within a function? As it turns out, JavaScript will let you do whatever you want:
1 2 3 4 5 6 7 8 9 10 | |
What happened to Fido?
1 2 3 4 5 | |
Looks like the name change was permanent. And by the way, by always using var, we can prevent such dangers:
1 2 3 4 5 6 7 8 9 10 | |
1 2 3 4 | |
By using var within the function, we created an entirely different dog and did not alter the original.
Before we go any further, I must admit that hadn’t heard the word arity until I crossed paths with JavaScript. I reckon I’m not alone in this, so here’s a definition courtesy of Wikipedia:
In logic, mathematics, and computer science, the arity of a function or operation is the number of arguments or operands the function or operation accepts.
OK. This sounds like something I know from Ruby land. Here’s a familiar example:
1 2 3 4 5 6 | |
According to the above definition, the initialize method of the Dog class takes exactly one argument. You could say its arity is one (more commonly, this is known as a unary function).
Ruby cares about arity, and will give you very nice error messages to make you aware of this:
1 2 3 4 5 6 7 8 | |
I tried to make a new Dog with 0 arguments, and Ruby was expecting 1. So Ruby blew up. This is arity checking at work.
JavaScript does not care about arity! Here’s photographic proof (this is a lot easier to see in the browser’s JavaScript console):

To review what just happened:
Dog (yeah, functions are really all-purpose in JavaScript, so that right there was a class definition of sorts).Dog takes a name.Dog, fido, and did not pass in any arguments.fido.Dog object with a name of undefined.Whenever it can, JavaScript will try to help you out, whether you want it to or not. If you say a Dog has a name and then forget to give it one, JavaScript will trust that this was your intent and will throw in an undefined rather than yelling at you.
Ruby cares about defining an object’s attributes and behaviors up front. Objects in Ruby behave in consistent and predicatable ways.
Using our prior definition of the Dog class, Ruby will let us know that we haven’t taught Dogs to bark yet:
1 2 3 4 5 6 7 8 | |
Of course! We did not define a bark method, so we get a predictable NoMethodError.
JavaScript doesn’t care about defining all of an object’s attributes and behaviors up front, and pretty much lets you do whatever you want, whenever you want. Here’s a continuation of the console session above:

fido to bark, having never defined a bark function or attribute. JavaScript quietly returned undefined.fido.bark the value of 'woof', and JavaScript happily obliged.fido bark, but the Dog object that is fido has been fundamentally altered, now containing a new bark attribute!So, can all Dogs bark now?

No, they cannot. Now the definition of Dog is a bit of a mess - fido is a Dog that can bark, while spot can’t. The very nature of Dog-ness has been brought into question, and JavaScript is fine with all of this. No errors, no complaining. For better or for worse.
This one is extra weird, so get ready.
In the hierarchy of Ruby objects, main is the top level:
1 2 3 4 5 6 | |
I don’t know why you’d want to mess with main, and Ruby makes certain it’s not easy to do so (in fact, it’s impossible to do so by accident):
1 2 3 4 5 6 7 8 9 | |
Want to mess with the top-level object in JavaScript? Go right ahead, JavaScript doesn’t care!
1 2 3 4 5 6 7 8 9 | |
I just named the global object after myself, and JavaScript did not care one bit. This example is a bit contrived, but believe me that some undesireable things can happen if you don’t watch out for global assignment. Here’s a (slightly) less contrived example:
1 2 3 4 5 6 7 8 9 10 11 12 13 14 15 16 17 18 19 20 21 22 23 24 25 26 27 28 | |
If I run this code, here’s what my debug statements reveal:
1 2 3 4 5 | |
As you can see, Bad Things can happen when the global object is always available. Fortunately, there is a way for you to make JavaScript care about this! You just have to tell JavaScript to use strict.
1 2 3 4 | |
Now, when we run the code, JavaScript will blow up just the way we want it to!
1 2 3 4 5 6 | |
This was a long post, and it probably could get longer. But I think this is enough to chew on for now. The bottom line is that JavaScript has some crazy ways, but these ways are not unlearnable, and the reward for learning them is a much saner coding experience. If you understand the quirks, remember your vars, and always use strict, you and JavaScript can be unstoppable, just like the honey badger.

Sinatra is a DSL (domain specific language) for building small dynamic web apps with all the beauty of Ruby and without the bulk of Rails. Recently, my Flatiron School classmates and I built a simple playlist app that allows users to perform all the basic CRUD operations on songs - you can create, retrieve, update, and destroy them. Emulating RESTful routes for these actions (à la Rails), I created something like the following:
1 2 3 4 5 6 7 8 9 10 11 12 13 14 15 16 17 18 19 20 21 22 23 24 25 26 27 28 29 30 31 32 33 | |
With the corresponding models and views that make these routes real, a working web app was born. Pretty darn cool. But there was a feature in the spec that was still left to add, and it became a bit of a challenge:
Whenever a song is created or updated, the user should see a message like this:

Here’s what I wanted to achieve:
songs/new and clicks ‘Submit’.songs/:id is rendered with a success message.In order to get this to work, I would have to somehow pass a message from one action in the controller to another. The create (or update) action would have to pass a message along to the show action which would pass this message along to the view. It would be nice to have something like an envelope called success_message that could hold one of three values at any given time:
"Successfully created song." (right after the song is created)"Successfully updated song." (right after the song is updated)nil (immediately after the success message is rendered in the view)
According to this vision, I was able to put some yet-to-be-functional code in songs/show.erb:
1 2 3 4 5 6 | |
But how would @success_message, which would have to be definied in the show action in order for the show page to know about it, be able to hold a message the was created in another controller action (create or update)?
I knew that params is one such data object that holds values that can be passed from one action to another, but as it is already the envelope for carrying and delivering form data entered by the user, it didn’t seem like the right place for a success message to live. If only there was some other vessel, like params, but not…
There is. It’s a session! It becomes available to you as soon as you put this in your application controller:
1 2 3 4 5 | |
Once you’ve added that, you get this handy little object called session that you can access in any of your controllers, which can in turn pass along any value it contains to a view. Just to see what it looked like before doing anything with it, I put a binding.pry inside my index action in songs_controller.rb, fired off shotgun, and loaded the index page on my local server. Here’s what pry spat out when I asked it what session was:
1 2 | |
Here it is again, split up onto several lines for readability:
1 2 3 4 5 6 7 8 | |
So that’s our session object, before we’ve done anything with it. Inside it there’s "session_id", a unique key that lives inside your cookie for the life of your session. What else is in there? Having just learned about preventing cross-site request forgery, I presumed "csrf"=>"598119612cef0d88134413ddd54bad52" to be the CSRF token. If you want to learn more about this (and you should!), read about it here. Finally there’s "tracking", which I believe holds information about the user’s browser. For our current purposes (creating a flash message), we don’t need to care about these values, but it helps to see how session is structured and what kinds of things it can contain.
Let’s move on and see how we can use this session object to help us with our success message.
Before doing anything to it, it would help to understand what kind of object session is. It looks like an ordinary Ruby hash, but in fact it is a special kind of Rack object. Why guess when you can pry it?
1 2 | |
As it turns out, the SessionHash object has a lot in common with a Hash object. 103 methods in common (out of 177 total), to be exact:
1 2 | |
One hash-like thing you can do with session is put new keys into it, with values that you can assign and change at your whim. And since the session persists from one HTTP request to another, it can pass values around from one action in the controller to another. This sounded like just the right object to hold the success message!
Here’s what I did (after enabling sessions, as shown above):
1) At the bottom of my create action (immediately before redirecting to the show page), I added a :success_message key to session, setting its value to the one-time message I want my users to see:
1 2 3 4 5 6 7 | |
2) I did the same thing for my update action:
1 2 3 4 5 6 7 8 | |
3) Then, I added some code at the top of the show action to pass this message along so it could be rendered by the erb template in the view, and to ensure that the message is immediately set to nil so it will only render once:
1 2 3 4 5 6 7 8 | |
Now my success message behaves exactly as I imaged it should, appearing and disappearing at the appropriate times.
Due to the stateless nature of HTTP requests, had I simply used an instance variable @success_message inside these get and post actions, any value assigned to it would have been instantly forgotten the moment another request was made. The @success_message inside the two actions would have in fact been completely out of each other’s scope. The session, however, is available across all actions.
This ability to fake statefulness in your controllers opens up a world of functionality other than flash messages, not the least of which is maintaining a user’s “logged in” state as they browse from one page to another. Without sessions, almost all of the interactions and transactions that occur over the Internet as we know it could not even happen.
So if you haven’t yet, sit down and get to know the powerful little session. It’s definitely worth prying into.
Up until a few weeks ago, my entire coding toolbox consisted of a small sample of some built in Ruby methods. Two of these became blog post topics (#find and #slice), and one—the << method—became the central character of my first coding dream/nightmare, with reserved words while and true playing key supporting roles. I used these methods to write other pretty simple methods.
After just a few weeks at The Flatiron School, I’m quickly learning that building up complex programs, like web apps, can’t (or maybe really just shouldn’t) be accomplished by writing out method after method in one big file. You need the right structures and tools to create complex objects, persist them in a database, and express relationships between these objects. Using ActiveRecord, you get some really simple and powerful tools for all this that hide a huge amount of complexity away, allowing you focus on designing your app to do what you want it to do.
While ActiveRecord makes it easy to create models and associations, some of the concepts involved were hard for me to get my head around at first. One such concept was the join table. I ran up against a problem in need of a join table while working with my classmates on a lab involving modeling characters and actors.
In ActiveRecord speak, actors have many characters and a character belongs to an actor. Here, in all of its elegant simplicity, is how you’d create the models that express this relationship:
1 2 3 | |
1 2 3 | |
Now all we need are two tables (actors and characters) to make this association work. The characters table, being on the belongs_to side of the relationship, must have a column for the foreign key, actor_id. In ActiveRecord, this can be accomplished in remarkably few lines of code:
1 2 3 4 5 6 7 8 | |
1 2 3 4 5 6 7 8 9 | |
This is the basic pattern you’d follow to model any has_many belongs_to relationship in ActiveRecord. What seems like “magic” here is made possible by ActiveRecord Ruby methods that either give our associated classes more methods that let them interact with each other, or wrap SQL statements and hide them away (in the case of migrations). But that is a topic for another post.
Back to actors and characters. As my classmates and I were creating these models, two big things came to the surface:
1) We could not recall any of Tom Cruise’s many characters’ names.
2) What happens when a character has more than one actor? One of my favorite characters would most certainly break our has many/belongs to association—The Doctor.

How can we fit The Doctor into our current schema??? The more I thought about it, the more impossible it seemed. Here is an illustration:

The above is our simple model, before The Doctor comes along and breaks everything. Just to be sure I was grasping how NOT to try to include The Doctor and his many actors, here is how it might look:

Our actors table seems fine, but our characters table is definitely not okay, and we haven’t even included the eight doctors from the first twenty-six seasons yet.
With our current setup, we have to change the entire schema every time we add another Doctor. This is very, very bad. A database was designed for adding lots of rows. Not so for columns.
In order to make things right, we need a different association: many-to-many. Actors have many characters, and a character has many actors. In order to set our database up for this association, we need a join table. First the visual:

Now for the migration (assuming your actors table is still intact and you’ve already removed all but the name column from characters):
1 2 3 4 5 6 7 8 | |
We also need to change our actor and character models. In order for the association to work, we need to somehow connect our actors and characters table through the character_actor_relationships table. The association we need in our actor and character models is has_many :through:
1 2 3 4 | |
1 2 3 4 | |
Finally, we need a model for CharacterActorRelationship:
1 2 3 4 | |
Now we have the right associations and the right database schema to add all of the Doctors that ever were and ever will be throughout all time.
